One post tagged with "tutorial"

View All Tags

Build with SFPY - Part 1

On SFPY, anyone can integrate free decentralized payments in a traditional commerce setting using our APIs built on top of Ethereum and our payments protocol. This tutorial series will focus on developers looking to add crypto payments acceptance to their websites through an easy to use REST API.

The following topics will be covered but will be broken up into parts for brevity:

  1. Installing the go-sfpy library
  2. Initialize the client.
  3. Exposing an endpoint to create a new order
  4. Redirecting the customer to complete the payment.

I hope you find this useful and interesting enough to follow along. Future tutorials will cover how to integrate payments through smart contracts to showcase the flexibility of SFPY.

If you want to skip right ahead to a repository I have published you can head on over here

Part 1 - Installing the go-sfpy library#

Assuming you have a go service that you're working on, you can easily install our native SDK. Installation instructions are available here but I'll repeat them for convenience.

In your terminal, cd to the root of your service and make sure it is using Go Modules. If not, you can convert your service into a module by typing

go mod init <github.com/your-org/your-repo-name>

Then, reference go-sfpy in a Go file with import:

import (
"github.com/sfpyhub/go-sfpy/sfpy"
)

Alternatively, you can also explicitly go get the package into a project:

go get -u "github.com/sfpyhub/go-sfpy"

Part 2 - Initialize the sfpy client#

To use the SFPY client to make API requests, initialize it like so from within your service

client := sfpy.NewClient(apikey, secretkey)

NewClient accepts two arguments:

  • apikey: This is your SFPY Api key that is needed to authenticate all requests to the API. You can find this key on your dashboard.
  • secretkey: This is your webhook shared secret key used to validate whether incoming signatures from webhooks are valid.

Its almost always better to initialize this as a singleton when your service is starting up and pass it as an argument to your request handlers. For instance if you have a controller that handles incoming requests to create new, unpaid orders, you can pass the client as an argument like so:

Service handler struct#

type checkoutService struct {
db store.Database
logger log.Logger
... any extra properties
sfpy *sfpy.Client
}
func NewCheckoutService(
db store.Database,
logger log.Logger,
...,
sfpy *sfpy.Client,
) *checkoutService {
return &checkoutService{
db: db,
logger: logger,
...,
sfpy: sfpy,
}
}

Service instantiation#

Before initializing this service, you would initialize the sfpy client and pass that in as an argument like so:

// Assuming api key and secret key are passed in to the service
// via environment variables or a config file and are available
sfpy := sfpy.NewClient(apikey, secretkey)
// Assuming db, logger and any other property is already initialized
// and available to use
cs := NewCheckoutService(db, logger, ..., sfpy)

Part 3 - Exposing an endpoint to create a new order#

In a traditional commerce setting, customers add items to a cart, or make a purchase selection with the intention of paying for the good or service. At this point, developers are usually familiar with integrating something like Stripe or PayPal which handles collecting payment information on an externally hosted page, redirects the customer back to the store after a successful payment and notifies the merchant of a successful payment through a webhook so that the system can reconcile the order and mark it paid. This is the exact flow we will cover below.

Assuming you have an API endpoint hosted on your server to initialize an order, you will want to create a payment request on SFPY with details like total amount to charge, any optional discount or any optional tax to add. An overly simplified API contract is presented below:

type CreateOrder struct {
CustomerID string `json:"customer_id"`
ProductID string `json:"product_id"`
Quantity int `json:"quantity"`
}

Decode an incoming HTTP request into this struct

func DecodePostRequest(ctx context.Context, r *http.Request) (interface{}, error) {
var req CreateOrder
if err := json.NewDecoder(r.Body).Decode(&req); err != nil {
return nil, err
}
return &req, nil
}

Handle the business logic and API call to SFPY in your service (defined above)

func (cs *checkoutService) CreateOrder(ctx context.Context, request *CreateOrder) (interface{}, error) {
// Do any validations or custom business logic:
// - Verify that the product exists in your database
// - Verify that there is enough inventory to purchase
// - Fetch the product price details
// - etc...
//
// Once you're ready to request payment from the customer you can proceed as follows:
// Create an internal order in your system.
// This is for example purposes but assume
// something like this will happen on your service.
product := cs.db.FetchProduct(ctx, request.ProductID)
order := CreateNewInternalOrder(customer, product, quantity)
// Call SFPY to generate a new payment request
apiResponse, err := cs.sfpy.Endpoints.AddOrder(ctx, &requests.Request{
OrderService: &requests.OrderService{
Order: &requests.Order{
// Replace this with your Ethereum address
Address: "0x742Df1612A701a130c71C9Ce3971Db549917cE29",
// Replace this with your newly created order id
Reference: order.GetID(),
// Depending on whether this a test you can use
// types.RINKEBY,
// types.KOVAN,
// types.GOERLI,
// types.ROPSTEN
ChainID: uint(types.MAINNET),
Cart: &requests.Cart{
// Replace this with your site name
Source: "MyWebsite",
// If the customer cancels the payment, this is the
// url to redirect them back to. SFPY will perform a
// simple GET based redirect
CancelURL: "https://mystore.com/cart",
// When the customer completes the payment, SFPY will
// redirect them back to this URL. This is usually to
// show the customer a success page or order confirmation
// page
CompleteURL: "https://mystore.com/order/<order-id>/complete",
},
PurchaseTotals: &requests.PurchaseTotal{
SubTotal: &requests.PriceMoney{
// Currently we only support USD
Currency: "USD",
// Convert the product price to cents
// if you use dollar amounts
Amount: product.Price * quantity, // in cents
},
// Optionally add a discount
Discount: &requests.PriceMoney{
Currency: "USD",
Amount: 2000, // $20 in cents
},
// Optionally add a tax
TaxTotal: &requests.PriceMoney{
Currency: "USD",
Amount: 1000, // $10 in cents
},
},
},
},
})
if err != nil {
level.Error(as.logger).Log("message", "unable to create order", "error", err.Error())
return nil, err
}
// apiResponse contains a field called `Data` that is a json.RawMessage.
// You need to decode it to get access to the underlying payment request
// object
sfpyOrder := responses.Order{}
if err := json.Unmarshal(response.Data, &sfpyOrder); err != nil {
return nil, err
}
// Now you have access to the SFPY order object. You can store the order
// token in your database against your internal order object to refer to
// it once a payment has been made
order.SetExternalPaymentID(sfpyOrder.Token)
if err := order.Save(ctx); err != nil {
level.Error(as.logger).Log("message", "unable to update internal order", "error", err.Error())
return nil, err
}
// To convert the order object into a link that you can use to redirect the customer to,
// the SFPY client provides a handy function for you.
paymentLink := cs.client.ConstructLink(order.Token)
// You can now return this link in your response and perform a redirect
// on the front end or programmatically perform a redirect server side.
// For simplicity, we will return the payment link to the front end
return &Reponse{ Data: paymentLink }, nil
}

Step 4 - Complete the payment#

Once you've successfully performed the API request, you can return the generated payment link back to the front end. With javascript, after parsing the response, you can redirect the customer to SFPY to complete the payment as follows:

// This is your API call above
const paymentLink = await apiCall();
// Use this to redirect your customer to SFPY
window.location.replace(paymentLink);

Hopefully, if everything goes right, your customer will be redirected to SFPY to complete their payment using one of the 5 currently supported currencies:

  • ETH
  • USDC
  • DAI
  • TETHER
  • WBTC

Customer payments experience#

As an example, this is what your customer would experience.
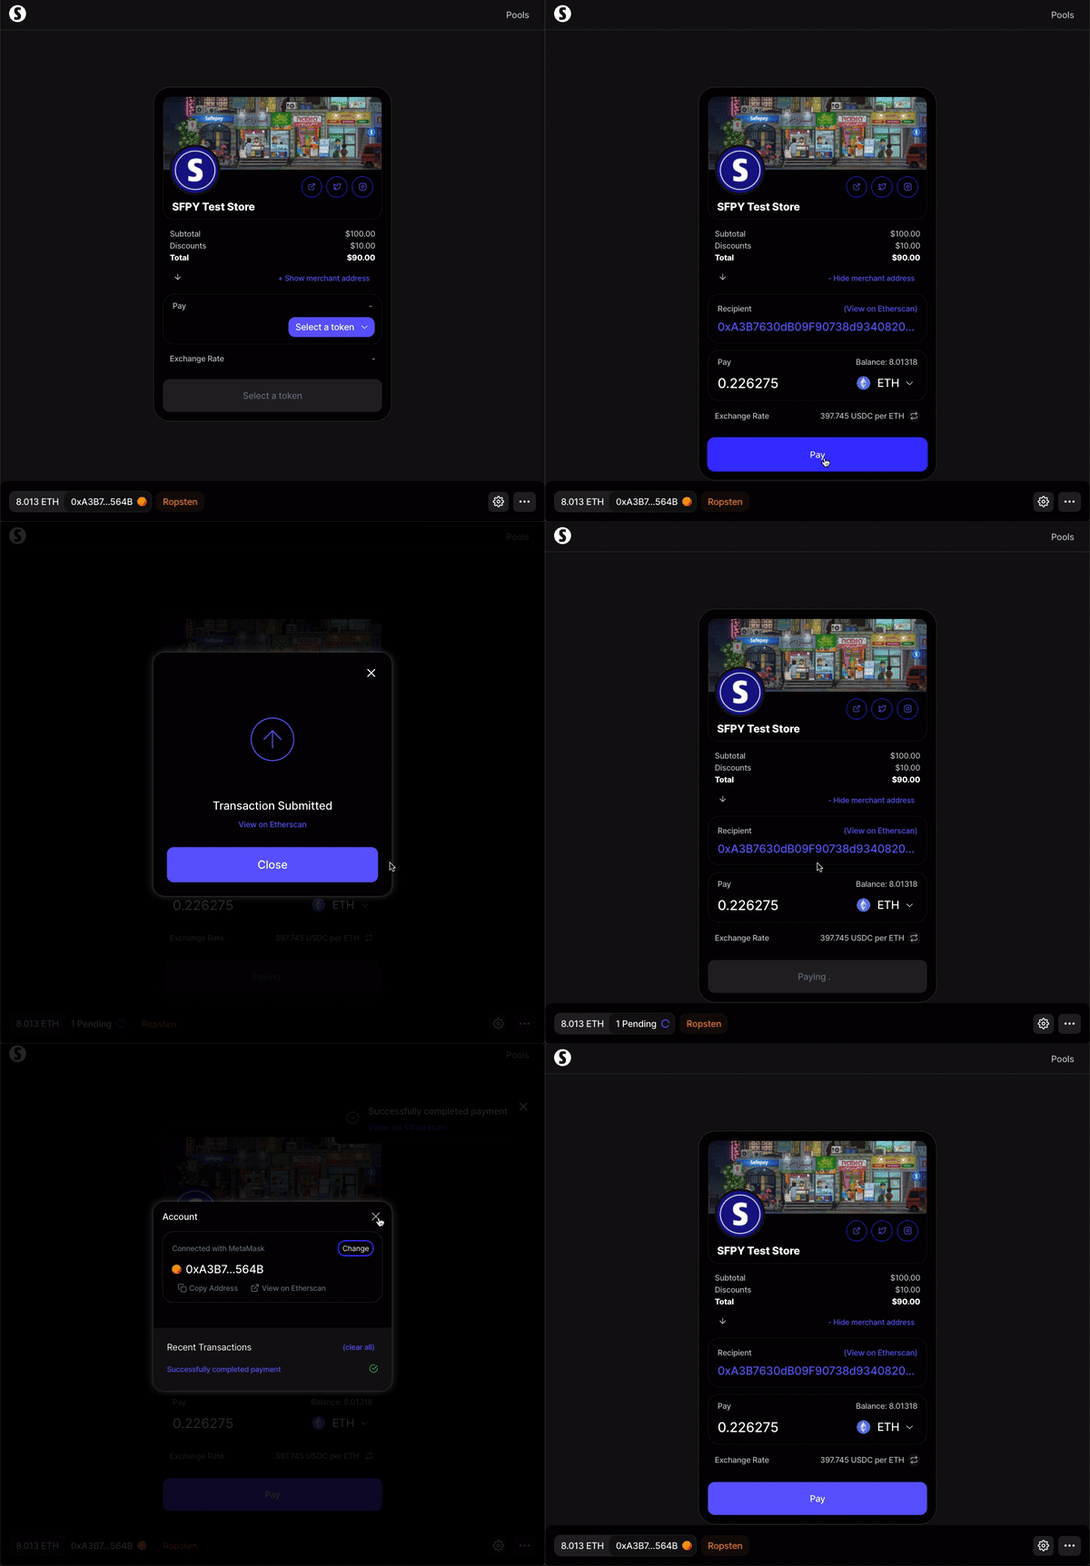
Make a payment

Conclusion#

Thank you for following along! In the next episode, we'll learn how to handle incoming webhooks in order to programmatically mark the order as PAID and save payment details to your database for future reference.

In the meantime, if you have any questions, please join us on our Discord Server. We're more than happy to help troubleshoot any problems you face.